Pink Noise Generator for Audio Testing
Pink Noise Generator for Audio Testing
Last Updated September 2012
For audio testing, a pink noise source is an invaluable tool. It is essentially a flat frequency response noise source, and will quickly show any anomalies in speaker systems, room acoustics and crossover networks. Before you decide on a completely analogue approach, make sure that you look at Project 182. This uses a digital MLS (maximum length sequence, aka ‘pseudo-random binary sequence’ (PRBS), or linear feedback shift register (LFSR)) to generate noise that is more consistent (and predictable) than that from an analogue noise source, but they are not always interchangeable.
White noise (the sound you hear when a TV is tuned to a non-existent station) has a frequency characteristic which raises the power level by 3dB with each increasing octave, and is not suitable for response testing (and may even blow your tweeters). By combining a 3dB / octave filter and a white noise source, we can get a very good approximation to ‘perfect’ pink noise, where the power in the octave (for example) 40 to 80Hz is exactly the same as in the octave 10kHz to 20kHz. There’s only one small problem – the most basic filter rolls off at 6dB/ octave, so to create a 3dB/ octave filter we have to use multiple filter sections. The number of sections determines how flat the filter will be, and more is better.
Figure 1 shows the circuit diagram for a basic filter, which can use a variety of dual opamps. I have shown the TL072, but you can use the RC4558 or LM1458 dual opamp for economy. The TL072 has the advantage of very high input impedance, so DC offset isn’t an issue. There is no point using a low-noise device in something which is specifically designed to make noise, so most opamps are fine for the purpose. While this is a nice simple circuit and will be acceptable for most applications, it has a limited frequency range, and it can be improved – naturally at the expense of complexity. The filter doesn’t have enough break points to cover the audio band particularly accurately, although it is better than you might imagine.
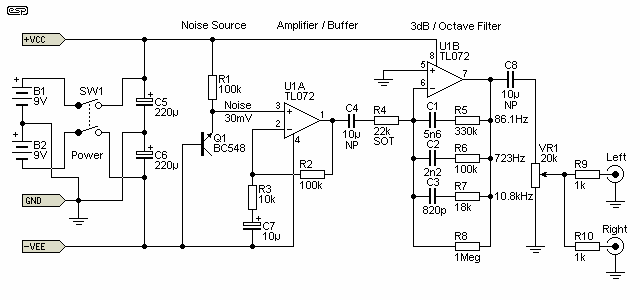
Figure 1 – Pink Noise Generator Circuit Diagram (Basic Filter)
The BC548 transistor is connected so its emitter-base junction is reverse biased, which creates a nice noisy zener diode. With the values shown, the average noise output is about 30mV (broadband). The transistor zener voltage is a bit iffy, mine runs at about 9V, but it could be anywhere from 5V up to 10V. In some cases, you may find that the transistor is not noisy enough, so try a few until you get one that makes lots of noise. Don’t re-use the rejects! Because they have been abused by the reverse breakdown, they are likely to be very noisy if used as an amplifier, and gain will probably be greatly reduced as well.
| Note Carefully: If the supply voltage is not regulated, there may be a problem with low frequency feedback from the noise source. The result is very low frequency oscillation, which may (or may not) show up as oscillation or more commonly, DC instability. The easiest is to use regulated supplies, although batteries should be stable enough with a direct connection. If you still experience excessive DC variation, it may be necessary to use separate regulators for the noise source and the filter. (This is rather unlikely because the noise source is operated at very low current.) |
The first opamp stage acts as an amplifier / buffer, providing a very high input impedance (so as not to load the noise source), and having a gain of 11 (20.8dB). The DC voltage at the output of the buffer should be the same (or very close to) that at the transistor zener.
The positive battery supply connects to pin 8 of the opamp, and the negative to pin 4 – don’t mix up the battery polarity, or the opamp will die.
The 10uF capacitors marked ‘NP’ are bipolar (non polarised) electrolytics. Although film caps can be used, they will contribute nothing but cost to the final project. Non-polarised caps are needed because of an unpredictable polarity for C4 and no little or no DC across C8, but C8 can be a normal polarised electrolytic cap if you wish (the voltage across it will be well under 1V, which is quite safe for normal electros). In case you were wondering, the point marked ‘Output’ is used by the IEC filter shown below if you decide to include it.
The second stage is a 3dB / octave filter, which is fairly linear across the frequency band 20Hz to 20kHz. This converts the white noise into pink noise, having equal energy in all 10 octaves of the audio band. Although this filter has only three break points (the frequencies are shown on the schematic), it’s perfectly alright for most applications. R4 is shown as ‘SOT’ (select on test), and the values shown in Figures 1 and 1A provide 10dB of gain at 1kHz. R4 can be varied if more (or less) gain is needed. Do not reduce R4 below around 2.2k, or it may overload the first opamp.
Because of the comparatively high zener voltage of the transistor, the supply voltage needs to be somewhat higher – 2 standard size 9V alkaline batteries in series (18V) should run the unit for far longer than you will ever want to listen to it. Because of the limited capacity of the 9V batteries, no indicator LED has been included, as this would draw more current than the rest of the circuit. The power switch must be a Double Pole, Single Throw (DPST) type, as both batteries must be disconnected. The centre-tap of the batteries is the earth (ground) for the unit. All earth points must be connected together. Naturally, the unit can also be mains powered (using P05 for example) with +/-15V supply rails. While this is a more expensive alternative initially, IMO battery powered instruments are often more of a hassle than mains power – especially for instruments that aren’t used often. The batteries die and have leaked corrosive goop over everything the next time you need the instrument (personal experience).
The pink noise filter shown in Figure 1A is more complex, but is far more linear over a wider range … 1Hz to 100kHz within 1dB across the full 50dB range. It’s been deliberately designed to be as flat as possible, so has many more filter sections than you may expect. It is possible to get better than shown, but the number of sections grows alarmingly. Again, the frequency for each filter section is shown, and each covers approximately one decade.
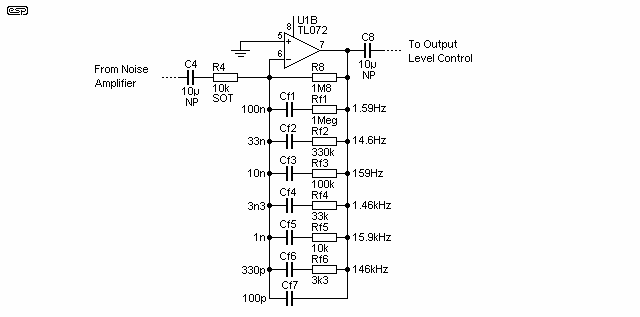
Figure 1A – Alternative 3dB/ Octave Filter
The entire circuit can be laid out on a piece of prototype board, and mounted in a suitable plastic or metal box. No special precautions are needed, other than ensuring that polarised components (transistor, opamp, and electrolytic capacitors) are connected the right way ’round. Values of components are not critical, so standard tolerance components should be fine throughout. The use of 1% metal film resistors to keep noise to a minimum is not required in this circuit! The transistor can actually be any small signal type you have handy, and so can the dual opamp (or a pair of single opamps can be used – note that their pinouts are completely different).
If you have an oscilloscope or can get access to one, check that the noise output is not clipping – you won’t be able to hear it, but if it clips the energy spectrum will be modified. There is no easy way to check without a ‘scope, and the noise output from transistors used in this way tends to vary somewhat. If clipping is observed (or you suspect it), increase the value of R3 or R4. Doubling the value (of one or the other – not both) will reduce the output by half. There are digital ‘pseudo-random’ noise generators available, but I don’t like them much because they have a cycle which eventually repeats, and this is very audible. By contrast, the unit described is completely random, as only analogue can be. For an example of a 23 bit pseudo-random noise generator, see Project 182.
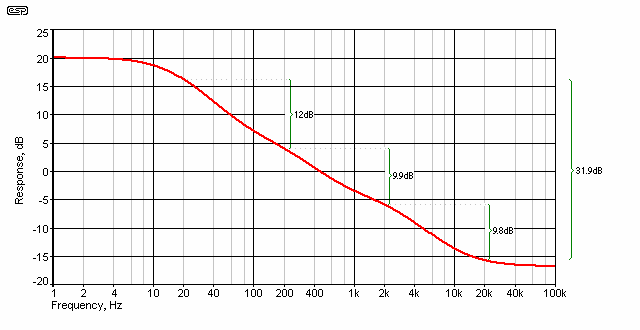
Figure 2 – Frequency Response of Basic Filter
Figure 2 shows the 3dB/ Octave response obtained from the basic circuit. It is not perfect (I have never seen one that was – other than that shown below which is better than any I’ve come across), but it is more than close enough for all but the most exacting of requirements. There is additional low bass rolloff created by C4 and C8, but these are not included in the graph. The error is typically less than 1dB over the audio band, although individual points may exceed that. The ripple in the rolloff slope is characteristic of a filter that is acceptable, but not optimised.
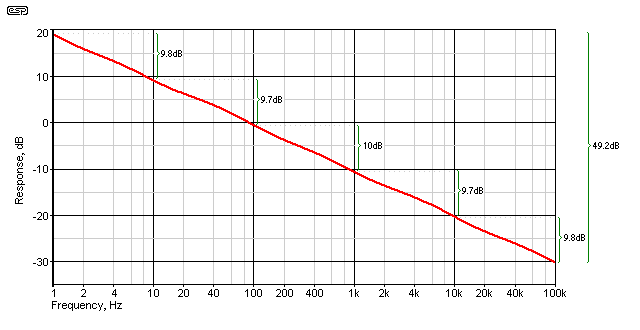
Figure 2A – Frequency Response of Alternative Filter
As you can see the curve is almost a perfectly straight line from 1Hz to 100kHz. The attenuation for each decade is also shown – they don’t add up to the total because the individual decade values have been rounded to one decimal place. For any individual decade, (e.g. from 400Hz to 4kHz, or from 27Hz to 270Hz) the error is less than 1dB, and in most cases will be less than 0.5dB. It is almost impossible to get any noise signal to have a perfect pink noise characteristic, so small errors are simply a part of life. Adding extra break point frequencies doesn’t improve the response shown above, in fact it becomes worse. Decade spacing appears to be close to optimum. There is a small amount of ripple in the filter slope (this is visible in the plotted response). This is a characteristic of all 3dB/ octave filters, but you will not find one published that is as good as that shown. I’m rather pleased with the response, especially since it uses a simple cascade of standard component values. Note that the effect of C4 is well below the lowest frequency, so has no effect. With C8 at 100uF (or more if you prefer) that will have no effect on response either.
It is perfectly acceptable to delete the lowest frequency filter if you don’t need the full bandwidth, but the filter components can’t simply be removed. The existing 1.8M resistor (R8) is replaced with 1M, and the 1M + 100nF filter (Rf1 and Cf1) is then removed. At the high frequency end, Cf7 should remain as shown.
Be warned that the frequencies below 20Hz can have a high amplitude, and can easily cause amplifier clipping and/ or excessive cone displacement unless a high pass filter is used. If the signal is connected to a tweeter via an amplifier but no filter, it is virtually guaranteed that the tweeter will be destroyed. The filter maintains boost at well below 1Hz – it has a maximum at 0.1Hz (25dB boost), but C4 will limit anything below 0.16Hz – still a potentially dangerously low frequency.
IEC Pink Noise Filters
Because of the potential for high energy at very low frequencies and damaging high frequencies, the IEC has defined a standard filter that can be used with pink noise generators. IEC 60268-1 defines a filter that is substantially flat between 22.4Hz and 22.4kHz.
The required response is shown below. You might need to implement this filter if you are testing to any IEC standard that specifies band limited pink noise, but if your application is critical you’d have to get the final unit officially certified and calibrated. Expect this service to cost several times the construction cost of the noise generator and filter.
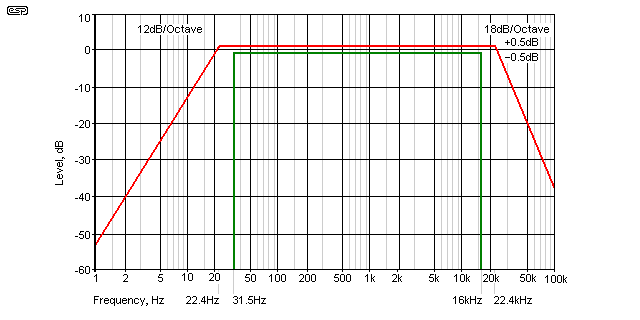
Figure 3 – IEC Pink Noise Filter Response
The intent is for the final filter’s response to remain within the area bounded by the red and green traces. This gives a predictable final response, but as is often the case with standards bodies, there is needless over-complication in the way things are specified. It would be far simpler to just provide the required filter slopes (as shown) and designate the -3dB frequencies. If the values are then calculated accurately, the response will automatically fit the required curve.
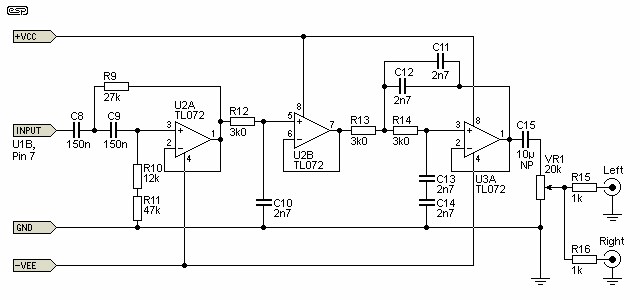
Figure 4 – Pink Noise Filter Schematic
Figure 4 shows an implementation of the filter that does fit the requirements. The input is taken directly from pin 7 of U1B (in Figure 1 or 1A). The first stage is a 12dB/octave high pass filter having a -3dB frequency of 22.7Hz, and this is followed by an 18dB/octave low pass filter set for 19.6kHz.
Part of the circuit looks more complex than it really is, because I have deliberately designed it so that the minimum number of different component values are needed, and that all values can be obtained. By using 2.7nF caps in series and parallel as needed, the requirement for impossible values is removed completely. 3.0k resistors are a standard value in the E24 series – unfortunately there was no choice for these.
As shown, there is a spare opamp (U3B). It should be connected with pins 6 and 7 shorted, and pin 5 returned to ground. Naturally you can use the opamp for something if you need to, but I couldn’t think of anything useful. It could be used as an additional gain stage if needed, or to buffer the output after the level control.
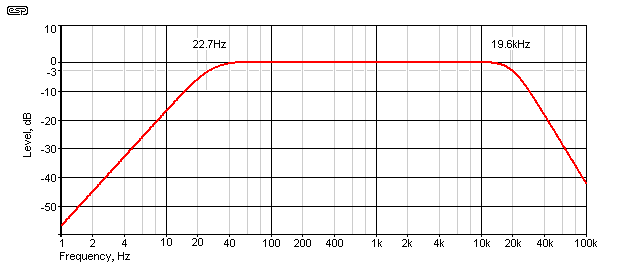
Figure 5 – Response of Pink Noise Filter
This is (close to) the frequency response of the filter circuit shown in Figure 4 – it’s actually changed very slightly due to the revised component values. This meets the requirements of IEC 60268-1, but more importantly should meet the needs of people performing pink noise testing. By eliminating significant out-of-band energy, the tests will be more reliable and predictable, with a reduced chance of damaging loudspeakers or amplifiers.
Using A Noise Generator
Connect the generator to your preamp, and slowly advance the level control until the sound level is at about the level of normal speech (about 65dB). Carefully listen for any ‘tonality’ in the sound, such as a low hum, or a point where the signal seems to disappear (sometimes referred to as a ‘suckout’), or anything which does not sound like pure noise. This will probably take a little practice – if you have a graphic equaliser handy, this is a great way to introduce peaks and dips to hear what they sound like.
Try listening through a good set of headphones, and compare the result with the speakers and room acoustics, you might be surprised at the result. I once read a story where an engineer was trying to find out where the hum in his noise generator was coming from. It turned out that the noise generator had no hum at all, but he was hearing the bass resonance from a badly designed loudspeaker – you can get surprising results from pink noise testing!
Remember that if you use the alternative filter and use larger than normal caps to get response down to 1Hz, this will cause very large cone excursions with no audible output. This is especially true of vented speaker enclosures, so extreme care is needed to ensure that you don’t cause speaker damage.
There is a lot to be said for using the IEC filter. It adds complexity and some cost, but the band limited noise signal is probably far more useful than an unrestricted noise source that includes a lot of energy outside the audible spectrum. Naturally, you can include a switch so you can have both.
References
Electronics Today International, November 1981 – Audio White Noise Generator Employs Digital Technique (original 3dB/octave filter component values)
IEC 60065, Annex C (Normative), Band-pass filter for wide-band noise measurement (extract from IEC 60268-1)


